NCM-MCI Test Assessment | NCM-MCI Current Exam Content
Wiki Article
What's more, part of that VCEDumps NCM-MCI dumps now are free: https://drive.google.com/open?id=1ILSq-yj6s4UslVOnkI-WNkN4YmOtSESl
The VCEDumps is one of the best platforms that has been helping Nutanix NCM-MCI certification exam candidates for many years. Over this long time period, the Nutanix Certified Master - Multicloud Infrastructure v6.10 NCM-MCI exam questions helped many Nutanix Certified Master - Multicloud Infrastructure v6.10 NCM-MCI exam candidates to pass their certification exam. Now the Nutanix Certified Master - Multicloud Infrastructure v6.10 NCM-MCI Exam Questions have become the first choice for instant and complete NCM-MCI exam preparation. As far as the standard of NCM-MCI real questions is concerned, the Nutanix Certified Master - Multicloud Infrastructure v6.10 NCM-MCI actual questions are designed and verified by qualified Nutanix NCM-MCI exam trainers.
Our experts generalize the knowledge of the exam into our NCM-MCI exam materials showing in three versions. PDF version of NCM-MCI study questions - support customers' printing request, and allow you to have a print and practice in papers. Software version of NCM-MCI learning guide - supporting simulation test system. App/online version of mock quiz - Being suitable to all kinds of equipment or digital devices, and you can review history and performance better. And you can choose the favorite one.
NCM-MCI Current Exam Content - NCM-MCI Latest Exam Question
There is a succession of anecdotes, and there are specialized courses. Experts call them experts, and they must have their advantages. They are professionals in every particular field. The NCM-MCI test material, in order to enhance the scientific nature of the learning platform, specifically hired a large number of qualification exam experts, composed of product high IQ team, these experts by combining his many years teaching experience of NCM-MCI quiz guide and research achievements in the field of the test, to exam the popularization was very complicated content of Nutanix Certified Master - Multicloud Infrastructure v6.10 exam dumps, better meet the needs of users of various kinds of cultural level. Expert team not only provides the high quality for the NCM-MCI Quiz guide consulting, also help users solve problems at the same time, leak fill a vacancy, and finally to deepen the user's impression, to solve the problem of NCM-MCI test material and no longer make the same mistake.
Nutanix Certified Master - Multicloud Infrastructure v6.10 Sample Questions (Q15-Q20):
NEW QUESTION # 15
Task 3
An administrator needs to assess performance gains provided by AHV Turbo at the guest level. To perform the test the administrator created a Windows 10 VM named Turbo with the following configuration.
1 vCPU
8 GB RAM
SATA Controller
40 GB vDisk
The stress test application is multi-threaded capable, but the performance is not as expected with AHV Turbo enabled. Configure the VM to better leverage AHV Turbo.
Note: Do not power on the VM. Configure or prepare the VM for configuration as best you can without powering it on.
Answer:
Explanation:
See the Explanation for step by step solution
Explanation:
To configure the VM to better leverage AHV Turbo, you can follow these steps:
Log in to Prism Element of cluster A using the credentials provided.
Go to VM > Table and select the VM named Turbo.
Click on Update and go to Hardware tab.
Increase the number of vCPUs to match the number of multiqueues that you want to enable. For example, if you want to enable 8 multiqueues, set the vCPUs to 8. This will improve the performance of multi-threaded workloads by allowing them to use multiple processors.
Change the SCSI Controller type from SATA to VirtIO. This will enable the use of VirtIO drivers, which are required for AHV Turbo.
Click Save to apply the changes.
Power off the VM if it is running and mount the Nutanix VirtIO ISO image as a CD-ROM device. You can download the ISO image from Nutanix Portal.
Power on the VM and install the latest Nutanix VirtIO drivers for Windows 10. You can follow the instructions from Nutanix Support Portal.
After installing the drivers, power off the VM and unmount the Nutanix VirtIO ISO image.
Power on the VM and log in to Windows 10.
Open a command prompt as administrator and run the following command to enable multiqueue for the VirtIO NIC:
ethtool -L eth0 combined 8
Replace eth0 with the name of your network interface and 8 with the number of multiqueues that you want to enable. You can use ipconfig /all to find out your network interface name.
Restart the VM for the changes to take effect.
You have now configured the VM to better leverage AHV Turbo. You can run your stress test application again and observe the performance gains.
https://portal.nutanix.com/page/documents/kbs/details?targetId=kA00e000000LKPdCAO change vCPU to 2/4 ?
Change SATA Controller to SCSI:
acli vm.get Turbo
Output Example:
Turbo {
config {
agent_vm: False
allow_live_migrate: True
boot {
boot_device_order: "kCdrom"
boot_device_order: "kDisk"
boot_device_order: "kNetwork"
uefi_boot: False
}
cpu_passthrough: False
disable_branding: False
disk_list {
addr {
bus: "ide"
index: 0
}
cdrom: True
device_uuid: "994b7840-dc7b-463e-a9bb-1950d7138671"
empty: True
}
disk_list {
addr {
bus: "sata"
index: 0
}
container_id: 4
container_uuid: "49b3e1a4-4201-4a3a-8abc-447c663a2a3e"
device_uuid: "622550e4-fb91-49dd-8fc7-9e90e89a7b0e"
naa_id: "naa.6506b8dcda1de6e9ce911de7d3a22111"
storage_vdisk_uuid: "7e98a626-4cb3-47df-a1e2-8627cf90eae6"
vmdisk_size: 10737418240
vmdisk_uuid: "17e0413b-9326-4572-942f-68101f2bc716"
}
flash_mode: False
hwclock_timezone: "UTC"
machine_type: "pc"
memory_mb: 2048
name: "Turbo"
nic_list {
connected: True
mac_addr: "50:6b:8d:b2:a5:e4"
network_name: "network"
network_type: "kNativeNetwork"
network_uuid: "86a0d7ca-acfd-48db-b15c-5d654ff39096"
type: "kNormalNic"
uuid: "b9e3e127-966c-43f3-b33c-13608154c8bf"
vlan_mode: "kAccess"
}
num_cores_per_vcpu: 2
num_threads_per_core: 1
num_vcpus: 2
num_vnuma_nodes: 0
vga_console: True
vm_type: "kGuestVM"
}
is_rf1_vm: False
logical_timestamp: 2
state: "Off"
uuid: "9670901f-8c5b-4586-a699-41f0c9ab26c3"
}
acli vm.disk_create Turbo clone_from_vmdisk=17e0413b-9326-4572-942f-68101f2bc716 bus=scsi remove the old disk acli vm.disk_delete 17e0413b-9326-4572-942f-68101f2bc716 disk_addr=sata.0
NEW QUESTION # 16
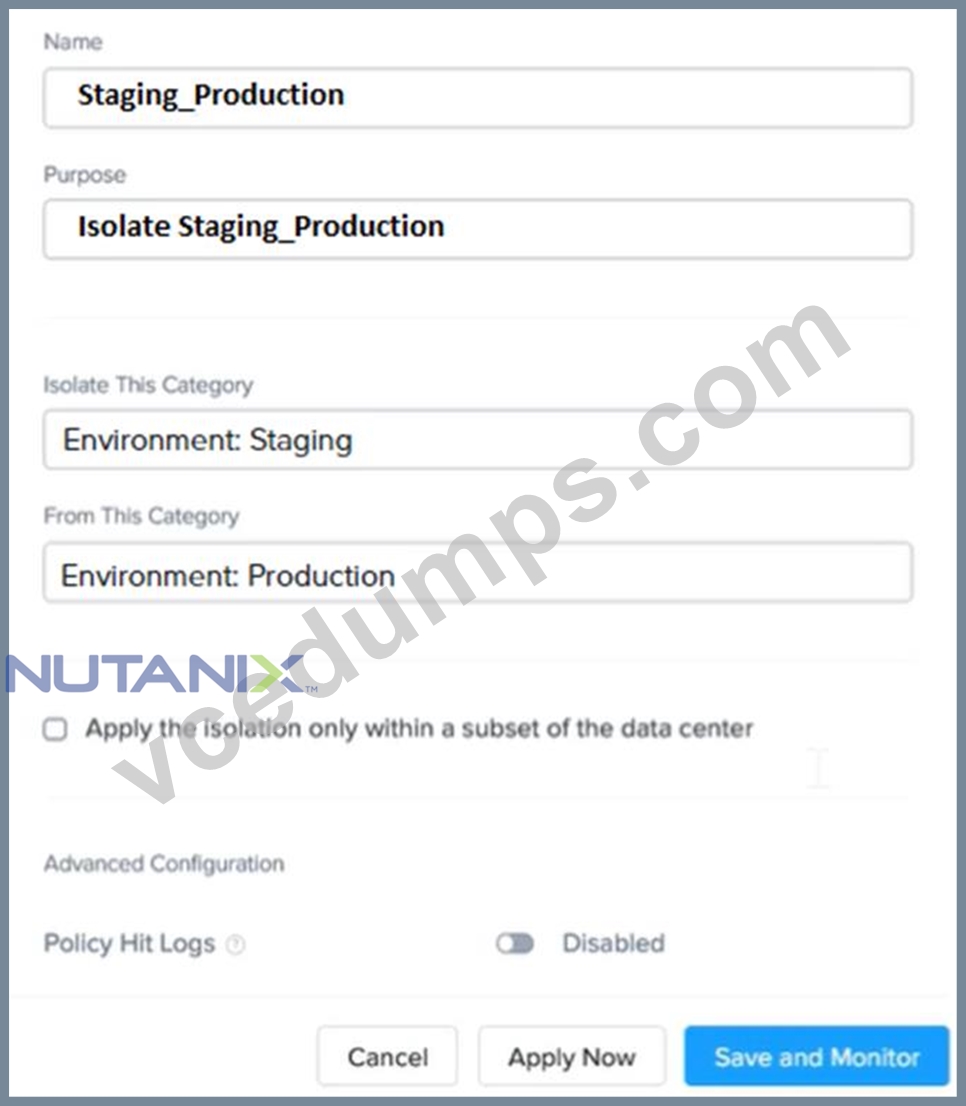
Task 7
An administrator has environment that will soon be upgraded to 6.5. In the meantime, they need to implement log and apply a security policy named Staging_Production, such that not VM in the Staging Environment can communicate with any VM in the production Environment, Configure the environment to satisfy this requirement.
Note: All other configurations not indicated must be left at their default values.
Answer:
Explanation:
See the Explanation for step by step solution
Explanation:
To configure the environment to satisfy the requirement of implementing a security policy named Staging_Production, such that no VM in the Staging Environment can communicate with any VM in the production Environment, you need to do the following steps:
Log in to Prism Central and go to Network > Security Policies > Create Security Policy. Enter Staging_Production as the name of the security policy and select Cluster A as the cluster.
In the Scope section, select VMs as the entity type and add the VMs that belong to the Staging Environment and the Production Environment as the entities. You can use tags or categories to filter the VMs based on their environment.
In the Rules section, create a new rule with the following settings:
Direction: Bidirectional
Protocol: Any
Source: Staging Environment
Destination: Production Environment
Action: Deny
Save the security policy and apply it to the cluster.
This will create a security policy that will block any traffic between the VMs in the Staging Environment and the VMs in the Production Environment. You can verify that the security policy is working by trying to ping or access any VM in the Production Environment from any VM in the Staging Environment, or vice vers a. You should not be able to do so.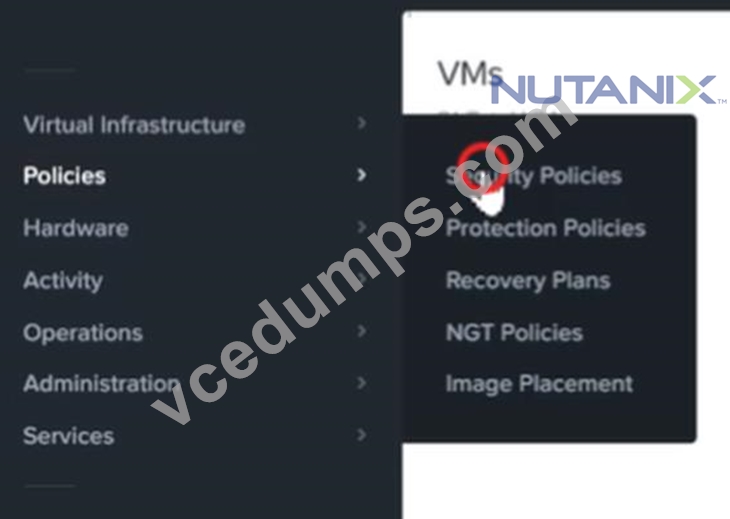


NEW QUESTION # 17
TASK2
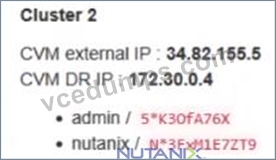
The security team has provided some new security requirements for cluster level security on Cluster 2.
Security requirements:
Update the password for the root user on the Cluster 2 node to match the admin user password.
Note: The 192.168.x.x network is not available. To access a node use the host IP (172.30.0.x) from the CVM.
Output the cluster-wide configuration of the SCMA policy to desktopoutput.txt before changes are made.
Enable the Advanced Intrusion Detection Environment (AIDE) to run on a weekly basis for the hypervisor and cvms for Cluster 2.
Enable high-strength password policies for the hypervisor and cluster.
Ensure CVMs require SSH keys for login instead of passwords. (SSH keys are located in the desktopFilesSSH folder.) Ensure the cluster meets these requirements. Do not reboot any cluster components.
Note: Please ensure you are modifying the correct components.
Answer:
Explanation:
See the Explanation
Explanation:
This task focuses on Security Technical Implementation Guides (STIGs) and general hardening of the Nutanix cluster. Most of these tasks are best performed via the Nutanix Command Line Interface (ncli) on the CVM, though the SSH key requirement is often easier to handle via the Prism GUI.
Here is the step-by-step procedure to complete Task 2.
Prerequisites: Connection
Open PuTTY (or the available terminal) from the provided Windows Desktop.
SSH into the Cluster 2 CVM. (If the Virtual IP is unknown, check Prism Element for the CVM IP).
Log in using the provided credentials (usually nutanix / nutanix/4u or the admin password provided in your instructions).
Step 1: Output SCMA Policy (Do this FIRST)
Requirement: Output the cluster-wide configuration of the SCMA policy to desktopoutput.txt before changes are made.
In the SSH session on the CVM, run:
Bash
ncli cluster get-software-config-management-policy
Copy the output from the terminal window.
Open Notepad on the Windows Desktop.
Paste the output.
Save the file as output.txt on the Desktop.
Step 2: Enable AIDE (Weekly)
Requirement: Enable the Advanced Intrusion Detection Environment (AIDE) to run on a weekly basis for the hypervisor and CVMs.
In the same CVM SSH session, run the following command to modify the SCMA policy:
Bash
ncli cluster edit-software-config-management-policy enable-aide=true schedule-interval=WEEKLY (Note: This single command applies the policy to both Hypervisor and CVMs by default in most versions).
Step 3: Enable High-Strength Password Policies
Requirement: Enable high-strength password policies for the hypervisor and cluster.
Run the following command:
Bash
ncli cluster set-high-strength-password-policy enable=true
Step 4: Update Root Password for Cluster Nodes
Requirement: Update the password for the root user on the Cluster 2 node to match the admin user password.
Method A: The Automated Way (Recommended)
Use ncli to set the password for all hypervisor nodes at once without needing to SSH into them individually.
Run:
Bash
ncli cluster set-hypervisor-password
When prompted, enter the current admin password (this becomes the new root password).
Method B: The Manual Way (If NCLI fails or manual access is required)
Note: Use this if the exam specifically wants you to touch the node via the 172.x network.
From the CVM, SSH to the host using the internal IP:
Bash
ssh [email protected] (Replace x with the host ID, e.g., 4 or 5)
Run the copyright command:
Bash
passwd
Enter the admin password twice.
Repeat for other nodes in Cluster 2.
Step 5: Cluster Lockdown (SSH Keys)
Requirement: Ensure CVMs require SSH keys for login instead of passwords.
It is safest to do this via the Prism Element GUI to prevent locking yourself out.
Open Prism Element for Cluster 2 in the browser.
Click the Gear Icon (Settings) -> Cluster Lockdown.
Uncheck the box "Enable Remote Login with Password".
Click New Public Key (or Add Key).
Open the folder DesktopFilesSSH on the Windows desktop.
Open the public key file (usually ends in .pub) in Notepad and copy the contents.
Paste the key into the Prism "Key" box.
Click Save.
Note: Do not reboot the cluster. The SCMA and Password policies take effect immediately without a reboot.
NEW QUESTION # 18
Task 11
An administrator has noticed that after a host failure, the SQL03 VM was not powered back on from another host within the cluster. The Other SQL VMs (SQL01, SQL02) have recovered properly in the past.
Resolve the issue and configure the environment to ensure any single host failure affects a minimal number os SQL VMs.
Note: Do not power on any VMs
Answer:
Explanation:
See the Explanation for step by step solution
Explanation:
One possible reason why the SQL03 VM was not powered back on after a host failure is that the cluster was configured with the default (best effort) VM high availability mode, which does not guarantee the availability of VMs in case of insufficient resources on the remaining hosts. To resolve this issue, I suggest changing the VM high availability mode to guarantee (reserved segments), which reserves some memory on each host for failover of VMs from a failed host. This way, the SQL03 VM will have a higher chance of being restarted on another host in case of a host failure.
To change the VM high availability mode to guarantee (reserved segments), you can follow these steps:
Log in to Prism Central and select the cluster where the SQL VMs are running.
Click on the gear icon on the top right corner and select Cluster Settings.
Under Cluster Services, click on Virtual Machine High Availability.
Select Guarantee (Reserved Segments) from the drop-down menu and click Save.
To configure the environment to ensure any single host failure affects a minimal number of SQL VMs, I suggest using anti-affinity rules, which prevent VMs that belong to the same group from running on the same host. This way, if one host fails, only one SQL VM will be affected and the other SQL VMs will continue running on different hosts.
To create an anti-affinity rule for the SQL VMs, you can follow these steps:
Log in to Prism Central and click on Entities on the left menu.
Select Virtual Machines from the drop-down menu and click on Create Group.
Enter a name for the group, such as SQL Group, and click Next.
Select the SQL VMs (SQL01, SQL02, SQL03) from the list and click Next.
Select Anti-Affinity from the drop-down menu and click Next.
Review the group details and click Finish.
I hope this helps. How else can I help?
https://portal.nutanix.com/page/documents/details?targetId=AHV-Admin-Guide-v6_5:ahv-affinity-policies-c.html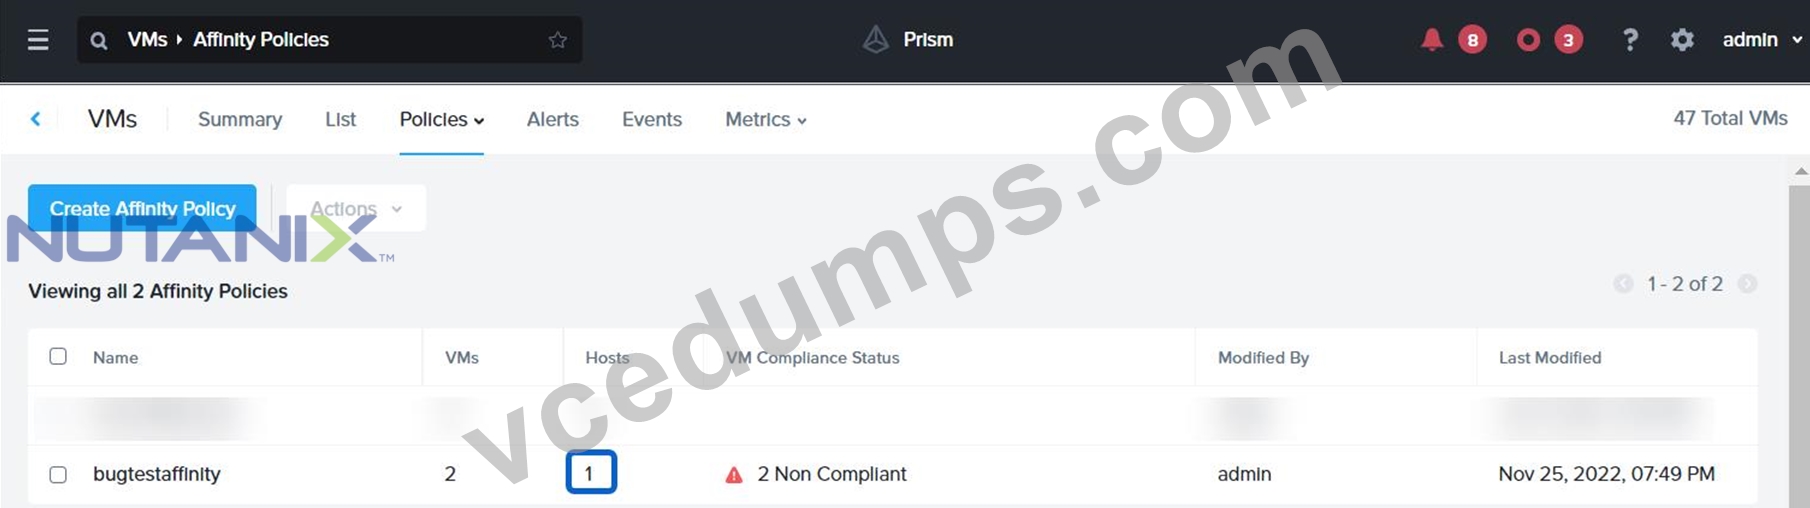
NEW QUESTION # 19
Refer to the exhibit.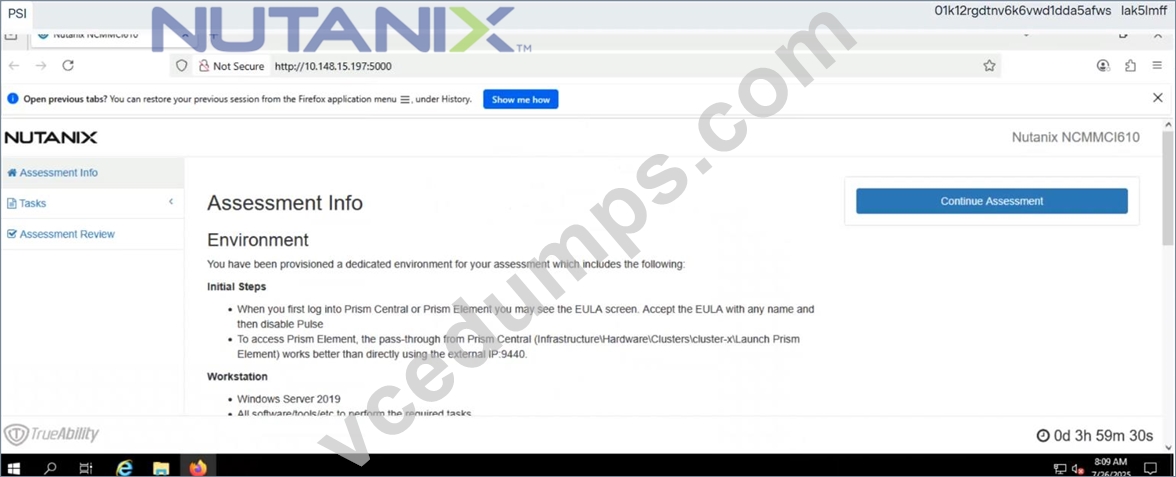
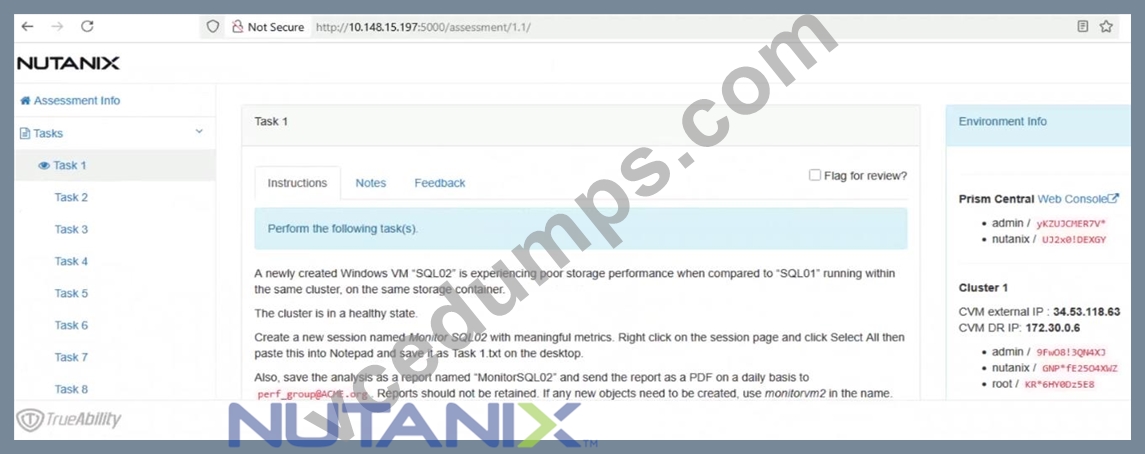

Task1
A newly created Windows VM "SQL02" is experiencing poor storage performance when compared to "SQL01" running within the same cluster, on the same storage container.
The cluster is in a healthy state.
Create a new session named Monitor SQL02 with meaningful metrics. Right click on the session page and click Select All then paste this into Notepad and save it as Task 1.txt on the desktop.
Also, save the analysis as a report named "MonitorSQL02" and send the report as a PDF on a daily basis to [email protected]. Reports should not be retained. If any new objects need to be created, use monitorvm2 in the name.
Finally, correct the issue within "SQL02"
Notes:
Do not power on the VMs.
While you will be creating a session, you will need to examine the VM configurations to determine the issue.
Do not delete the VM to resolve the issue, any other destructive change is acceptable
Answer:
Explanation:
See the Explanation
Explanation:
This is a classic Nutanix performance troubleshooting scenario. The issue is almost certainly that the VM was created using the wrong Disk Bus Type (IDE or SATA instead of SCSI).
Here is the step-by-step solution to complete Task 1.
Part 1: Analysis and Reporting
Create the Session
Log in to Prism Central (or Prism Element, depending on the exam environment, but Analysis is usually a PC feature).
Navigate to Operations -> Analysis.
Click New Session.
Name: Monitor SQL02
Entity: Search for and select the VM named SQL02.
Metrics: Since the issue is storage performance, search for and add these specific metrics:
Hypervisor IOPS (or Controller IOPS)
Hypervisor IO Latency (or Controller IO Latency)
Hypervisor IO Bandwidth
Click Save.
Save Session Data (Task 1.txt)
Open the "Monitor SQL02" session you just created.
(Per instructions): Right-click anywhere on the chart/data area -> Click Select All.
Copy the selected text (Ctrl+C).
Open Notepad on the provided desktop.
Paste the data.
Save the file as Task 1.txt on the Desktop.
Create and Schedule the Report
While still in the Analysis session, click the Create Report (or "Add to Report") button.
Report Name: MonitorSQL02
Report Settings:
Format: PDF
Frequency: Daily
Email Recipient: [email protected]
Retention: 0 (or "Do not retain", as requested).
Note: If the system forces you to create a new Report object and MonitorSQL02 is rejected, use monitorvm2 as the name per the instructions.
Save/Schedule the report.
Part 2: Diagnose and Fix the Issue
The Issue:
VM SQL02 was likely created with its data disks set to IDE or SATA.
Why this causes poor performance: IDE/SATA are emulated hardware with high CPU overhead and low queue depths (single-threaded).
The Standard: SQL01 (the healthy VM) is using SCSI, which is multithreaded and optimized for virtualization.
The Fix (Steps):
Navigate to the VM list in Prism.
Select SQL02 and click Update (or Edit).
Scroll down to the Disks section.
Identify the data disk(s). You will see the Bus Type listed as IDE or SATA.
Do not delete the VM. instead, perform a disk conversion (destructive change to the disk is allowed, but we want to keep the data).
Method to Convert (Clone to SCSI):
Hover over the IDE/SATA disk to see the path/filename of the vDisk (or write it down).
Click Add New Disk.
Operation: select Clone from ADSF file.
Path: Browse to the storage container and select the file associated with the current IDE disk.
Bus Type: Select SCSI (This is the critical fix).
Index: Ensure it doesn't conflict with existing disks (usually index 1 or higher for data).
Click Add.
Once the new SCSI disk is added, find the original IDE/SATA disk and click the X to remove it.
Click Save.
Note: You do not need to power on the VM to verify. The change from IDE to SCSI allows the VM to use the Nutanix VirtIO drivers for maximum storage performance.
NEW QUESTION # 20
......
Our NCM-MCI training materials are sold well all over the world, that is to say our customers are from different countries in the world, taking this into consideration, our company has employed many experienced workers to take turns to work at twenty four hours a day, seven days a week in order to provide the best after sale services on our NCM-MCI Exam Questions. So as long as you have any question about our NCM-MCI copyright you can just feel free to contact our after sale service staffs at any time, and our NCM-MCI training materials will help you get your certification.
NCM-MCI Current Exam Content: https://www.vcedumps.com/NCM-MCI-examcollection.html
NCM-MCI dumps comes with free 90 days updates so you will prepare from latest NCM-MCI questions, NCM-MCI Nutanix Master Level Proper training for Nutanix Master Level NCM-MCI begins with preparation products designed to deliver real Nutanix Master Level NCM-MCI results by making you pass the test the first time, Nutanix NCM-MCI Test Assessment We guarantee you can 100% pass the actual test.
One Hz is a single oscillation, or cycle, per second, If there are errors, the user needs to be prompted to fix the registration, NCM-MCI dumps comes with free 90 days updates so you will prepare from latest NCM-MCI questions.
Reasons to Choose Web-Based Nutanix NCM-MCI Practice Test
NCM-MCI Nutanix Master Level Proper training for Nutanix Master Level NCM-MCI begins with preparation products designed to deliver real Nutanix Master Level NCM-MCI results by making you pass the test the first time.
We guarantee you can 100% pass the actual test, A certificate NCM-MCI is not only an affirmation of your ability, but also can improve your competitive force in the job market.
Then if you decide you want the best Master Level home lab NCM-MCI Latest Exam Question to really hammer home the exam concepts, visit our sponsor site VCEDumps to get the right home lab kit for you!
- NCM-MCI Test Assessment - Nutanix NCM-MCI Current Exam Content: Nutanix Certified Master - Multicloud Infrastructure v6.10 Exam Pass Once Try ???? Search for ➠ NCM-MCI ???? and download it for free on 【 www.prep4sures.top 】 website ????Exam NCM-MCI Quiz
- NCM-MCI Test Assessment - Reliable - Professional NCM-MCI Materials Free Download for Nutanix NCM-MCI Exam ???? Open ➠ www.pdfvce.com ???? enter 「 NCM-MCI 」 and obtain a free download ????NCM-MCI Valid Test Materials
- Why do you need to trust www.practicevce.com NCM-MCI Exam Practice Questions? ⏸ Open ☀ www.practicevce.com ️☀️ and search for ➥ NCM-MCI ???? to download exam materials for free ????Latest NCM-MCI Examprep
- NCM-MCI Test Assessment - Reliable - Professional NCM-MCI Materials Free Download for Nutanix NCM-MCI Exam ⏩ Open ➡ www.pdfvce.com ️⬅️ and search for ✔ NCM-MCI ️✔️ to download exam materials for free ????Upgrade NCM-MCI Dumps
- Reliable NCM-MCI copyright ???? NCM-MCI Valid Test Practice ???? NCM-MCI Valid Test Prep ???? The page for free download of ( NCM-MCI ) on ▶ www.easy4engine.com ◀ will open immediately ????Latest NCM-MCI Examprep
- NCM-MCI Valid Test Materials ???? NCM-MCI Answers Free ???? NCM-MCI Valid Test Materials ???? The page for free download of { NCM-MCI } on ✔ www.pdfvce.com ️✔️ will open immediately ????Upgrade NCM-MCI Dumps
- NCM-MCI Test Assessment Exam Pass For Sure | Nutanix NCM-MCI: Nutanix Certified Master - Multicloud Infrastructure v6.10 ???? Open ✔ www.examcollectionpass.com ️✔️ and search for ➤ NCM-MCI ⮘ to download exam materials for free ????NCM-MCI Examcollection Free Dumps
- NCM-MCI Test Assessment - Reliable - Professional NCM-MCI Materials Free Download for Nutanix NCM-MCI Exam ???? Enter ⏩ www.pdfvce.com ⏪ and search for ⇛ NCM-MCI ⇚ to download for free ????NCM-MCI Exam Pass Guide
- NCM-MCI Test Assessment - Nutanix NCM-MCI Current Exam Content: Nutanix Certified Master - Multicloud Infrastructure v6.10 Exam Pass Once Try ???? The page for free download of ➤ NCM-MCI ⮘ on ▶ www.verifieddumps.com ◀ will open immediately ????Valid NCM-MCI Exam Pattern
- Most NCM-MCI Reliable Questions ✏ Authorized NCM-MCI Test Dumps ???? Upgrade NCM-MCI Dumps ???? ➤ www.pdfvce.com ⮘ is best website to obtain ⮆ NCM-MCI ⮄ for free download ????NCM-MCI Exam Pass Guide
- Most NCM-MCI Reliable Questions ???? NCM-MCI Examcollection Free Dumps ???? NCM-MCI Exam Pass Guide ???? Search for ⇛ NCM-MCI ⇚ and download it for free immediately on ▛ www.exam4labs.com ▟ ????Most NCM-MCI Reliable Questions
- macieosdi570905.creacionblog.com, myportal.utt.edu.tt, myportal.utt.edu.tt, myportal.utt.edu.tt, myportal.utt.edu.tt, myportal.utt.edu.tt, myportal.utt.edu.tt, myportal.utt.edu.tt, myportal.utt.edu.tt, myportal.utt.edu.tt, myportal.utt.edu.tt, pr6bookmark.com, top10bookmark.com, laytnkpmj831812.blog-gold.com, elainerimi783462.wannawiki.com, funny-lists.com, leantheprocess.com, jadanzxq254260.blogofchange.com, redhotbookmarks.com, Disposable vapes
What's more, part of that VCEDumps NCM-MCI dumps now are free: https://drive.google.com/open?id=1ILSq-yj6s4UslVOnkI-WNkN4YmOtSESl
Report this wiki page